Thursday, March 25, 2021

Ginny Turns 6!

Our dog Ginny turns 6 today! And what a year she's had since turning 5... 

1) That little human baby we brought home in January 2020 started rolling around soon after Ginny's 5th birthday - and then sitting, and crawling, and now walking! 

2) Both my husband and I have been home nearly 24/7 throughout the last year, thanks to the pandemic - meaning verrrry limited crate time for Ginny, and leading to lots of "what is going on, what am I supposed to be doing now, why are you all home all the time?" whining. 

3) She mysteriously fractured a toe in July 2020 (no idea how - she just started limping all of a sudden) and needed to wear a splint for a few weeks - and then a cone while her pressure sores from the splint healed.

4) And if all that wasn't enough... we moved houses on her too! Ginny loves her new, large fenced-in yard, and all the spots in the new house where sunlight streams through the windows, leaving sunny patches on the floor... but she also misses her old house, I'm sure. There were some kind neighbors who always stopped to say hello to her on walks (humans and fellow dogs alike), whom she hasn't seen since we left. And for several months there, her furniture kept slowly disappearing from the old house, everything kept changing, and she had no idea what was happening. 

Poor Ginny's been through a lot lately - but she's hanging in there and doing her best!

To celebrate Ginny's birthday, here are some of my favorite pictures of her from the last year:


Tuesday, March 16, 2021

Painting the New House: Guest Room

The third room I painted in the new house (after our daughter's bedroom, and the accent wall in the dining room), was the new guest bedroom in the basement. This room had a white brick wall and a white exterior drywall wall with a window, both from the original open-floorplan basement, as well as two new drywall walls the contractor had just built for us. They were all white and primed, but not painted. There was a lot of furniture going into this room - a bed, dresser, hope chest, two nightstands, and a treadmill - and I wanted to paint the space before all that furniture was in the way. We moved ourselves (and all the boxes and small furniture we could fit in our cars) about a week before we had professional movers bring the rest of our furniture - so it was during the "in between" week when we were living there but all of our furniture wasn't yet, that I painted this room. 

I taped the ceiling, trim, and the white brick wall (which we were leaving white to act as an accent wall) the day before, and then did the actual painting in one night, after my daughter had gone to sleep. I did all of the painting myself, while my partner worked on installing lots of shelves in the new pantry space in our basement. I then did touch-ups the next day to finish it off.


The room is dark because there are only two small ceiling lights, both of which are on one side of the room. There are also several changes in ceiling height (to account for ducts in the ceiling, presumably), which cast shadows on some walls and parts of the ceiling. And I wasn't getting any natural light from the window, because it was January in Michigan, and I was painting at like 9 pm. So hopefully it still looks good when we add some lights to the nightstands and/or in the summer when some sunlight enters the room! ;)

We bought new curtains for the window. The brown wood furniture, as well as the pink/green/white quilt, were in the guest bedroom of our old house (which also had green walls, although a slightly different green). In our old house, the hope chest/bench was at the foot of the bed, but here it works nicely as a window seat under the window instead.


Now we just need the pandemic to end, so it's safe for visitors to come stay with us again! :)

Monday, March 8, 2021

Painting the New House: Dining Room

I already shared photos of the yellow and orange stripes I painted for my daughter's nursery in our new house. That was by far the most time consuming paint project I took on so far. But that's not to say it was the only one! We also painted an accent wall in the dining room, and we painted the new guest room and bathroom in the basement, as well as repainted the en suite bathroom upstairs. I say "we" because my partner and I are a team - I picked out all the paint colors, he went to Home Depot (in a pandemic!) to pick them up, and (depending on the room in question) we both did some of the prep work and painting. I couldn't have done it without his help and support... But now that I've gotten that out of the way, I'll just be using "I" pronouns from here on out, because yes, I did most of the actual painting - especially in the dining room, which is what today's blog post is about.

When we bought it, the house had the same beige color on the walls of the living room, entryway, dining room, and the upstairs hallway - except for one wall in the dining room, which was also beige, but with thick dark blue stripes. I've nothing against stripes (hello, did you see what I did in my daughter's bedroom?), but these stripes were just Too Much. First, they weren't painted all that well, and when you got up close you could see where the paint seeped through the painter's tape and made a line that was not very precise. But second, it didn't fit our aesthetic. Our dining room furniture is a combination of hand-me-downs from my grandmother and my husband's great aunt. It's not modern or "cool" like the dark blue stripes were trying to be. I have my grandmother's teacup collection hanging on the wall, and we have a cabinet full of tchotchkies ranging from more teacups, to glass souvenirs, to Judaica (Jewish items like Shabbat candle holders and Kiddish cups). On top of all that, the dining room and living room have an open floor plan, and our living room furniture is also a grandmotherly aesthetic (and also inherited from my grandma) - floral couches that I absolutely adore. The dark blue just wasn't working for me.


Repainting that wall wasn't an urgent update the house needed immediately... but it was a project I wanted to do before moving in regardless, just because I knew it'd be easier to do before we had too much furniture and stuff in the room. Thankfully, it was also a quick project, since it was just one wall. In our old house, we painted the kitchen this pretty dusty brownish-pink color called "Cinnamon Cocoa," and I thought something similar to that would work well for our new dining room accent wall, but I also didn't want it to be too close in value (light to dark scale) to the beige color that the rest of the dining room (and much of the rest of the main floor) was. So I had my husband grab me some paint swatches in that general pink color family, and ultimately settled on "Red Clover," a bit darker than "Cinnamon Cocoa" was. It looks great against the beige, goes well with the wooden dining room furniture, and ties in nicely with the floral couches in the living room (which have some pinks in them). 

I made a special trip down to the new house one night and taped the two walls the accent wall touches, as well as the ceiling, floor trim, and window trim, a couple days before I planned to paint. 


Then when we went down that weekend (the last weekend before the weekend that we officially moved in!), I spent about 2 hours painting the wall while my husband and daughter played nearby. It took 2 coats of paint to cover some of the dark blue. Because it was so close to moving day, we'd brought many of our boxes and smaller pieces of furniture already, so there was a lot of stuff in the dining room - and a lot of it wasn't the right stuff (a.k.a. the stuff that would eventually live in the room). But the big furniture wasn't there at least... and all the boxes actually came in handy, since they allowed me to cordon off the wall I needed to paint, to keep our 1-year-old away while I painted. I created a "wall" of boxes and used a small bookcase on wheels as a "door" to allow me to get in and out. 


And here's the wall once it was all finished, dry, and the white curtains were rehung on the window... and all the extra boxes and stuff moved to its proper location.


It looks even better with the furniture and decor in the room!


I love the way it turned out - just like repainting stripes in my daughter's room, this felt like taking a bit of our old house to the new house with us, since we used one of our favorite colors we painted in the old house as a basis for what this accent wall would be. I think it works great with our furniture!

Sunday, February 28, 2021

New Art Studio In Progress

There were a lot of things we immediately loved about our new house (which led to us placing an offer on it in the first place). The layout was just wonderful, with a small office (big enough for my husband, still currently working-from-home during the COVID-19 pandemic) on the main floor, a roomier kitchen than our old house, and a carpeted family room just off the kitchen, so I could easily see our daughter playing in the playroom from the kitchen. Then there were things we loved the potential of, but which just weren't quite right... yet. And the basement was one of those things.

The basement was already finished (which other houses we were considering did not have), and it had a walk-out to the nice, large, fenced-in backyard. But it was a completely open floor plan, and we wanted to divide the space into an art studio/office for me, a guest room, an additional playroom for our 1-year-old, and a "pantry"/storage space with room for the extra fridge/freezer the previous owners left behind. It took some doing to figure out how best to orient those rooms in the space, but we settled on a layout that worked well for us, and over the course of several weeks, we were able to see our vision realized with the help of a local contractor.

Here are some pictures of what the basement looked like before we had it sectioned off with more walls:


The previous owners had a couch in the space where my new studio would go (which we paid for them to leave behind for us, and which we moved upstairs into the family room). There is also an electric fireplace built into the wall, and two windows looking out on the backyard, in my new studio. I love the natural light! (Though I admit, so far I've only had a chance to come down here to work after our daughter goes to bed, which is after it's already dark out. Thanks winter!)

And here's the room after the contractor was done building us new walls (but before we moved in all our furniture/stuff):


I was really excited to have a single room that could fit all of my "projects" - both studio art and graphic design. In our old house, I originally had my computer all the way up on the top floor, and my studio in the basement, and packing materials scattered in both places. When an Etsy order came in and I had to print notecards, package them for shipping, and ship them out, I had to walk up and down two flights of stairs to gather everything I needed. I created my art in one space, and scanned the artwork on an entirely different floor of the house; I then stored finished artwork in yet another room/closet. (I wrote a bit about trying to figure out how to organize my artwork/art supplies in this blog post.) Then, once our daughter was born and the COVID-19 pandemic shifted my husband to all-online school and then work, we rearranged the house a bit, moving both his desk and my desk down to the basement. I liked having my computer on the same floor as my studio... so when we decided to move, that was one of the first things I tried to figure out - how to make it work so that I could have a COMBO studio/office, instead of housing my artwork and my computer/desk in two different spaces. My BFA was a double concentration in graphic design and watercolor, and a decade later I continue to do both. I combine "fine art" techniques and digital techniques when I design patterns on my computer, print them out, trace them onto watercolor paper, paint them with traditional methods, scan them back to the computer, and resize them for printable notecards. Or when I draw colored pencil artwork using the computer to help find source material of different types of flowers. Even just creating art and then writing about the art on this blog, or uploading designs to Etsy to sell, requires the use of a "studio" and an "office". The more I thought about it, the less sense it made to physically separate these two sides of my work. I wanted a room that would be both (which I've started to call my "studio" IRL just so it's easier to differentiate in conversation from my husband's "office"). 

I measured all the furniture I wanted to fit into "my studio" and made sure that it would all fit in a to-scale floorplan I made in Adobe Illustrator, before we had the contractor start work on the basement. Once I was sure the room would be big enough and everything would fit (and that it wouldn't detract from other things we wanted to also have in the basement to have my studio so big), we went for it. (Side note: I'm so lucky to have a partner who supports my artwork and my desire to have this big space all just for "my" projects. I felt a little guilty taking up so much of the basement for my studio (especially since, as a new mom, I'm not using it very much these days), but he was always all for it, even when it meant taking the cool electric fireplace/space heater the previous owners had installed in one of the basement walls.)


The room is 21' x 14', and fits 1) my L-shaped computer desk with iMac, HP Officejet printer, and three storage towers of printer paper, photo paper, notecard paper, and envelopes, 2) my easel (which never even fit in the basement of our last house, because it was too tall for the short basement ceiling height), 3) a small desk perfect for colored pencil drawings, 4) five bookcases to organize art supplies and office supplies, as well as extra wall space for organizing gift wrap supplies and other craft supplies, 5) a sewing cabinet (which I don't even use and is so far purely aspirational), and 6) my large folding table in the center of the room, which I use for watercolor paintings and large-scale projects. There is also (hopefully) room for a shelving unit/cabinet for storing large art paper (drawing paper, newsprint, watercolor paper, and unused canvases), but that it yet to be purchased and/or built.

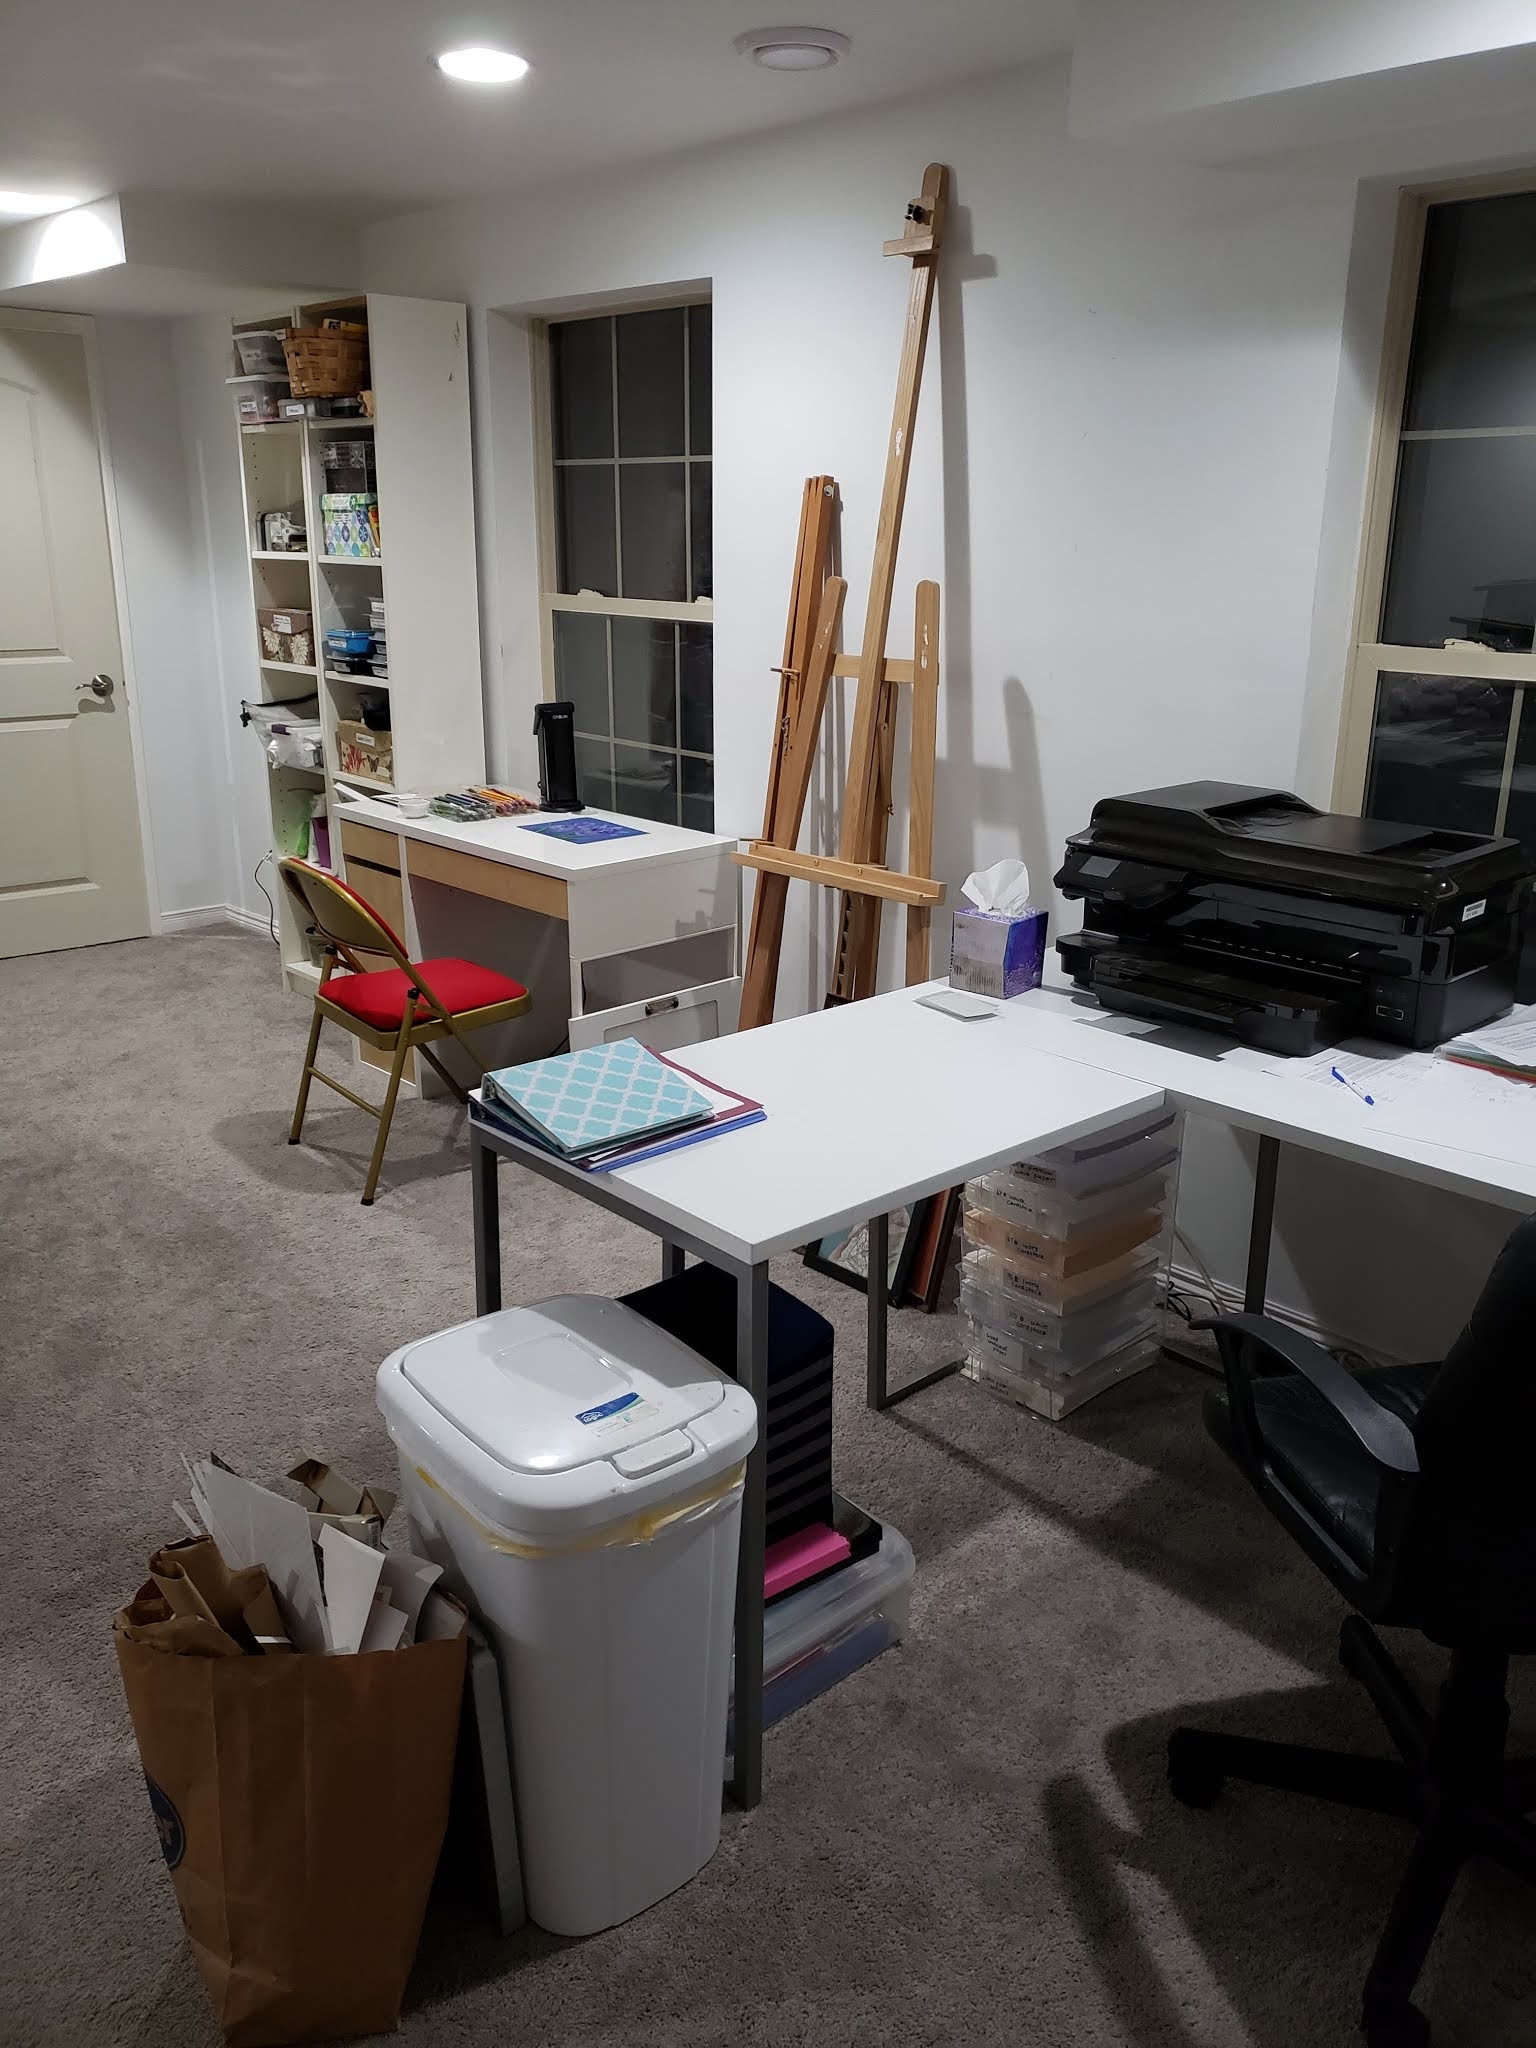
Here are some pictures of the room thus far, as I've started to unpack and organize everything:


It's not done yet - obviously some things are still in boxes, unpacked. I have to figure out what exactly I'm going to do to store my art paper and other art supplies that are too large for the bookcases. My husband and his sister want to build me a cabinet, thinking that would be easier than purchasing one (they are quite expensive, and quite heavy, and we aren't sure how we'd get it down there if we didn't... build one in the room or near the room). So right now the going plan is to wait until the weather warms up, and then hopefully we can build some shelves or a cabinet, cutting the wood to size in the garage or on the back patio right outside my studio, and then bringing the pieces inside and assembling it in the room. But we will see what the warmer weather brings (assuming we ever get any... February in Michigan always has one feeling a bit pessimistic). :)

I'm so happy I got everything to fit. I just know having everything in the same room will really streamline my creativity/productivity - which is, as any parent will tell you, so important when your time to get not-parenting things done is so much less than it used to be before kids! :)