Rose #10 - the fourth rose from the left in the second row - was another rose with a lot of water droplets. So I started it as I did rose #4 and others with dewdrops - by marking where those circles of water are with a light colored pencil so that I could plan the rest of the colors of the rose around the droplets.


Then I started building up a few quick, light, preliminary layers to mark down where the petals would be.


Because the dewdrops on this rose are so prominent and because the end rose would be fairly light in color (as opposed to a dark red rose, etc.), I then went in and started making the dewdrops even lighter/whiter. Water drops are mostly transparent - at least in the center - while the edges appear lighter or darker as the light distorts through the globular shape. So for a darker rose, I would not have made the entire circles of the droplets quite so light. Since I was planning to make the entire rose lighter, I made the droplets lighter as well.

Then I started building up those layers of light colors. The edges of this rose are pale pink, almost white, while the inner shadows are more orangey.


Then I started adding some pinker pinks, blending the pink into the orange so that it looked more like skin tone.


I also darkened the orangey shadows with a bit of dark red, and added red "shadows" (thin lines) around the water droplets so that they looked more three-dimensional, rather than just spots on the rose.
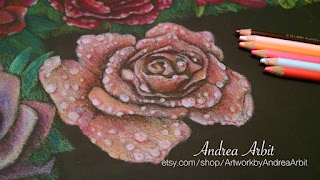


Here is the completed rose (minus the green leaves in the background - which I added in later and will be included in a future post). In the picture immediately below, you can see rose #10 surrounded by roses #1-9.


Then I started building up a few quick, light, preliminary layers to mark down where the petals would be.


Because the dewdrops on this rose are so prominent and because the end rose would be fairly light in color (as opposed to a dark red rose, etc.), I then went in and started making the dewdrops even lighter/whiter. Water drops are mostly transparent - at least in the center - while the edges appear lighter or darker as the light distorts through the globular shape. So for a darker rose, I would not have made the entire circles of the droplets quite so light. Since I was planning to make the entire rose lighter, I made the droplets lighter as well.

Then I started building up those layers of light colors. The edges of this rose are pale pink, almost white, while the inner shadows are more orangey.


Then I started adding some pinker pinks, blending the pink into the orange so that it looked more like skin tone.


I also darkened the orangey shadows with a bit of dark red, and added red "shadows" (thin lines) around the water droplets so that they looked more three-dimensional, rather than just spots on the rose.


Here is the completed rose (minus the green leaves in the background - which I added in later and will be included in a future post). In the picture immediately below, you can see rose #10 surrounded by roses #1-9.


No comments:
Post a Comment