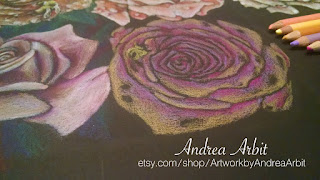
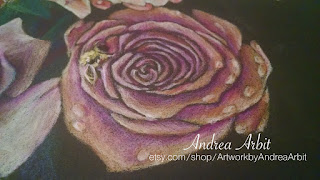
Continuing with the step-by-step photos of my "30 Days" colored pencil drawing on black paper, the focus of today's post is rose #23.
I was a little behind on adding in the green background, so before I started on rose #23 I actually went through and added in some leaves and grass to roses #19-22. I didn't completely fill in the backgrounds - because I wanted to relate some of the backgrounds to the roses in row #5 below, and was waiting until I got to that last row to finish up - but I did make sure to put the "important" parts of the background in, so that I wouldn't forget which roses I wanted to have certain background elements for, and so the space for those elements would be "reserved" on the page, taking up the amount of space I wanted them to take up.
For rose #20 (the purple rose, second from the left in row #4), I added some curly vine-type greenery. Most of the other leaves I'd done up to this point were stereotypical shorter leaves, and I wanted that rose to have more whimsy to it, and look a little like it had some movement, or wind/a breeze in the background.
For rose #22 (fourth from the left in the 4th row), I made the background dark - using dark green, dark red, and dark blue, to match the background for rose #2 way back in the first row.
At this point, I saved the backgrounds for roses #19 & #21 to go back to later, and moved on to drawing rose #23 (and its neighbor, rose #24). These are the last two roses in the 4th row (second from the bottom).
For drawing rose #23, I started with a light orange/peach color. I also made sure to mark where the bumblebee was going to go in yellow, so that the space would be reserved for the bee as I went and built up layers.
Next, I added some light purple into the insides of the petals and some yellow-orange to the edges of the petals.
I added some bright magenta into the insides of the petals to start building up some darker shadows, and then layered a darker purple in as well.
To finish it off, I lightened the edges of the rose with a cream colored pencil, colored in the dewdrops in this same light color (so they would "pop" three-dimensionally off the petals a bit), and added detail to the bee.
Only 7 roses left - one more in row #4, plus the last six in row #5.


No comments:
Post a Comment